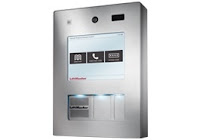
 The LiftMaster IPAC with VoIP Gate System is the first of its kind—an Internet-enabled outdoor
 access control system with VoIP capabilities. This unique gate system marks a milestone in security innovation for gated community access control systems. Whether for use as a residential access control system or a commercial automatic gate system, the LiftMaster IPAC Gate System can’t be beat!
You may have recently purchased the LiftMaster and are in need of help setting it up. We have assembled some quick programming tips to get your LiftMaster IPAC Gate System set up and ready to go.
Installing the LiftMaster IPAC Gate System
- Create a LiftMaster Hosted Cloud Service account by calling customer service at (800) 323-2276. They’ll guide you through account registration and payment setup.
- Next, you’re ready to install. Remove the unit from the box and place it face down. Use a punch tool of about one inch or less to remove the knockouts that will fit your installation requirements. Mount the unit to the flat surface or pedestal you are using. Ensure the unit is properly sealed.
- Connect any maglocks, door strikes, operators and other accessories to the relay board. Connect the transformer to the PWR IN terminal block on the relay board. Connect the Ethernet cable. Switch on the program mode by switching setting #1 to ON.
Connecting the LiftMaster IPAC Gate System
- Your system should now be on. It’s time to connect. Set up the network by touching the DHCP button, then touching the Activate button. Verify the Network and Internet connectivity settings in the Network Diagnostic screen.
- Connect to the LiftMaster IPAC Cloud Server by touching the Go Cloud button found in the Network Configuration – Advanced Settings screen.
- Exit Program Mode by turning setting switch #1 OFF.
Programming the LiftMaster IPAC Gate System
- Add a control panel by logging into your Hosted Cloud Service account at www.liftmaster.com/ipac. Navigate to Setup>Sites/Doors>Control Panels. Click on the New Control Panel button or link. Name the panel and enter the Control Panel ID found inside the IPAC. Click the Save Control Panel button. Remember the ID format is TEC-XX-XXXXX.
- Verify that the connection was successful by refreshing the screen. Ensure the Last Contact column shows a date/time for the newly added panel. It may take up to 20 minutes for the association to be made. To speed up the process, you can cycle power to the IPAC panel.
- Now you will create a site by navigating to Setup>Sites/Doors>New Site. Enter the site information and select your time zone. Hit Save.
- Create doors by navigating to More Operations>Add Door. Enter the door name and select the Control Panel, Board and Node that will be associated with the door. Click Save and repeat to add as many doors as you need.
- Create a telephone directory by navigating to Users>Telephone Entry System>Telephone Directories. Click the New Telephone Directory button. Enter the directory name and telephone entry code (4-6 digits). Click Save.
- Add the IPAC device by first navigating to Setup>Sites/Doors>Site Directory. Click on the name of the site. Now navigate to More Operations>Add IPAC Device. Select the control panel. Name the IPAC device and enter the SIP account information. Select DTMG Key—this is the key number on the tenant’s telephone that will activate the door. Select Yes for Accept Access Code so that entry codes can activate the doors. Select the IPAC directory. Hit Save.
- You can edit user group privileges by navigating to Users>Group Directory. Click on the group name that you’d like to edit. Click the Edit Group button and select the door schedule. Hit Save Group.
- Add a credentialed user by navigating to Users>User Directory. Click on the New User button and enter the user information. Hit Save User.
- Add any resident information by navigating to Users>Telephone Entry System. Click on the New Resident button. Select the directory name and enter the resident information. Hit Save.
- Test the directory, directory code and access code. If it all works, your unit is ready for use!
